Base 2
The fourth stage is a more difficult version of Stage 2. There are more rooms, and the enemies are more aggressive. Some of the power core seals are also protected by relatively hard shields - you must blast the shields until they crumble and break, revealing the core beneath it. You'll have to be much more vigilant and avoid the increase in enemy fire in order to stay alive. Remain crouching until it's safe to stand up and continue your assault. Naturally, the Spread gun makes survival in this stage easier, but it's quite possible to complete the stage without it.
- Room 1
-
Destroy both turrets to the left and right of the protected power core, then concentrate on the core to move onto the next room.
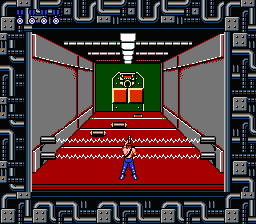
- Room 2
-
This room contains four power cores, but none of them are shielded, and they are all on the bottom. Crouch down and fire at each core while avoiding the gunfire overhead as you head from one to another.
- Room 3
-
A turret is mounted on the wall above two power cores. It isn't necessary to destroy the turret, but doing so can make it much easier to remove the shields and destroy the cores.
- Room 4
-
The configuration of this room may resemble the previous room, except that the turret and power cores have been moved down. The turret is not easily destroyed, but you can crouch to attack the cores and remain safe. A red soldier will provide you with a Barrier, so it's recommended to keep calm and get it. The Barrier will protect you anyway in the next screen.
- Room 5
-
If you haven't collect the Barrier in the previous room, focus on the single turret in the center before you work on the power cores on either side. Otherwise, always stand up and focus all your firepower on the cores. A red soldier will provide you with a Rapid fire upgrade.
- Room 6
-
Resembling the first room in Stage 2, this simple room contains a single power core, but slots for rolling mines also appear. Don't try to attack at first until you find the red soldier who carries a Spread gun if you don't have one. Then line yourself up with the seal and the rolling mines should miss you. Crouch when necessary, but concentrate on the seal to advance quickly.
- Room 7
-
Destroy the turret, then jump up to shoot the power core above the turret.
- Room 8
-
Same as the last room in Stage 2. Destroy the turrets to the left and right of the power core quickly, then fire at the seal to destroy it. Ignore the turret above the seal.
Boss: Terminal 2
Phase 1

The first phase of boss battle will be similar to the previous base's final battle, but only one turret and three power cores exist. As you have done in Stage 2, begin by destroying the power core in the way of the turret, and destroy the turret as quickly as possible. In this case however, when you begin shooting the turret, two types of robotic defenders will appear from the sides: the red shooting robots and the white gliding robots. A group of these robots will appear roughly every ten seconds in alternating waves. The shooting robots appear, stop above you, and fire three bullets at you. Theses red robots have decent aim. Shoot them while they’re still moving around if possible. The white gliding robots will move to your general area and try to jump on you. They are much easier to kill. These two groups of enemies will appear endlessly until you destroy the turret and the power cores.
Phase 2

Note that you should destroy the turret first before the rest of the power cores or the waves will continue when the boss appears. This boss is composed of four phantom images that move along the black display at the top of the screen. You can only damage the boss when two of the phantoms intersect with one other. When they do, they’ll stop for a moment before separating again. They each shoot out small pairs of bubbles that travel slowly while trying to home in on your location, before speeding up in your direction. If you have a Spread gun, simply stand in the middle and fire upward. You may have to occasionally jump over the bubbles if they get too close. If you don’t have a Spread gun, concentrate on one side first and then move on to the other side. Try to detonate the bubbles so you don’t have to move around too much to defeat this boss.