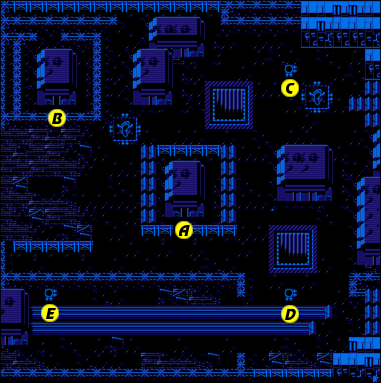
You'll arrive in the enemy base at night time, when things are pitch black. Your aim here is to find the Technodrome. It is found in one of the three underground passages, but which tunnel you'll find it in is selected at random when you enter the area. The other two tunnels will merely come to a dead-end. The passages are short but have the toughest enemies in the game; the porcupine enemies can inflict more than 2 squares of health per hit and both the porcupine and armadillo man require more hits to kill than regular enemies previously. In addition to the tunnels, there are also two buildings in which you'll find weapons and pizza. As you explore the darkened base and travel around on foot, security planes with search lights fly around in search of intruders. If you are caught in one of the spotlights, a foot soldier will appear to try and stop you.
Plan of Attack
- Optional: If you're in desperate need of pizza, or would like to rescue a captured turtle, explore building A.
- Optional: If you want to try to load up on Kiai scrolls, explore building B.
- Investigate all three tunnels, in search of whichever tunnel leads to the Technodrome. Defeat it to break in.
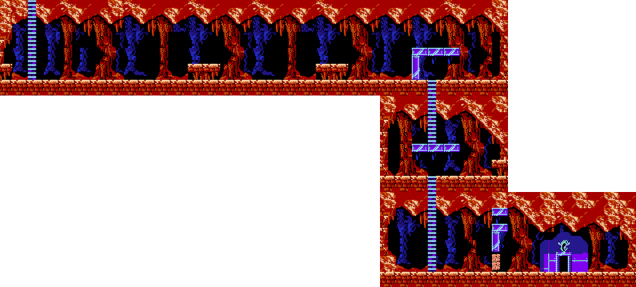
Building A
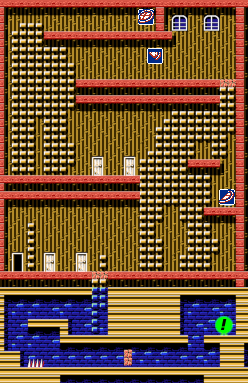
This is a building you should explore if your turtles are in need of more health, especially when the tunnel you choose out of the 3 turns out to be a dead-end instead of the technodrome. If most of your turtles are in good shape, it's probably not worth investigating this building unless one of your turtles has been captured. Deep in the basement of this building, you can rescue one of your captured brothers. Just smash the blocks above the ladder that leads down to reach the basement.
You'll find every variety of pizza here, from a single slize, to half of a pizza, to a full pizza. However, the half pizza on the first floor is the easiest one to get out of the three, and if you're not looking to battle too many foes, it may be enough to come in and out of Building A just to collect that half pizza. To get to the other pizzas, you'll need to climb up a series of ladders to the third floor. Along the way, mechanical spiders will try to stop you.
Fighting on ladders is a risky proposition. On the one hand, they can get you within striking distance of an enemy. On the other hand, if you get hit, it will send you falling down, unable to grab hold of any ladder to stop you. Whenever you climb to the top of a ladder, your turtle will stand, giving you the best offensive possibilities. Clear an area out of enemies without getting hit, and then grab onto the ladder again to find the next are where enemies try and stop you.
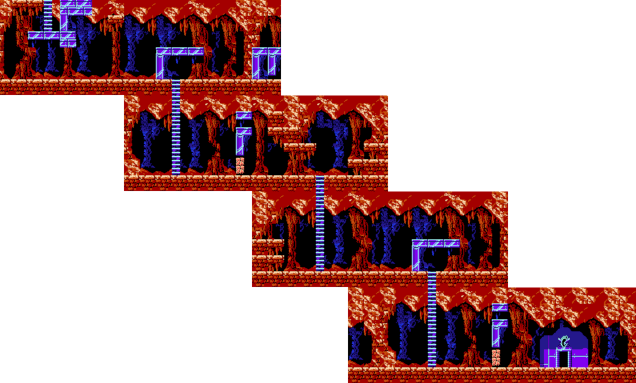
Building B
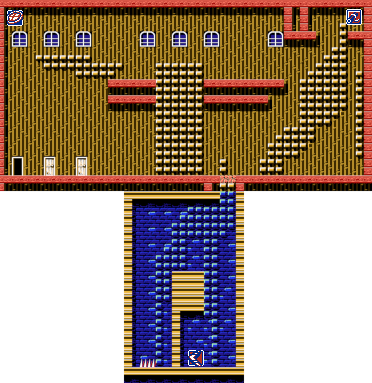
As with Building A, Building B is entirely optional. While it has a full pizza in the upper left corner that takes a little work to reach, the real prize it holds is two different special weapons. The highly sought after Kiai scrolls can be found in the upper right corner of the building. But to get it, you'll need to clear out several rock dropping birds, and mechanical spiders before you start climbing the ladders on the far right.
Once you make it to the second floor, you need to hope a bird doesn't fly down and knock you to the floor below, and into the regenerated enemies that you just worked so hard to clear out. Even if the bird does not appear, you need to quickly climb up to the top of the ladder so you can strike any mechanical spiders that get near you. If you successfully clear the ones guarding the scroll, you can collect it. While you're up there, you might as well collect the pizza on the opposite side as well.
There's a second weapon here, the Boomerang. While not as powerful as the scrolls, there's one aspect of the Boomerang in this building that makes it worth investigating: there is an endless supply of them. Normally, you have to completely leave a building and return to collect the items inside a second time. But for some reason, the Boomerangs in the bottom of the enemy-less basement return whenever you scroll up to the top level of the basement, and back down to the bottom, making it incredibly easy to collect 99 Boomerangs for any turtle in a matter of seconds.
The Tunnels
There's honestly no telling which tunnel you will actually find the Technodrome in. You're only way to find out is to investigate each of them until you stumble upon it. They are populated with new and somewhat difficult enemies, the most annoying of which are the mutant insects and mutant porcupines. Both have a large amount of health and take a good amount of attacks to remove. The mutant insects roll into balls and move quickly throughout an area. At times, you can get them to fly right off the side of the screen, where they will disappear and no longer threaten you. Other enemies include mutant spiders that dangle up and down on strings, and strange jellyfish like enemies which explode into four bubbles that spread out diagonally.
Tunnel C
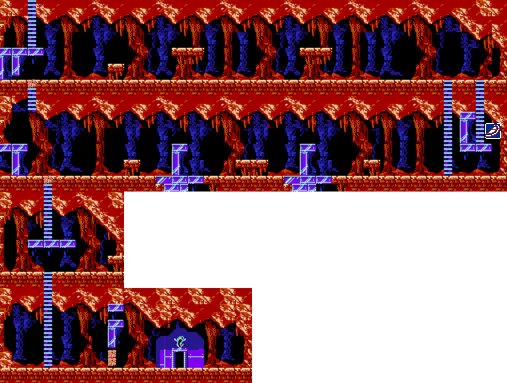
This is the easiest of the tunnels to make your way through. It's only long if you want to pursue the half pizza on the far right side of the second level, which you shouldn't because you should refuel in Building A before you enter here, and it's better to save it for the trip back if necessary. In fact, there's a handy (but one-way) shortcut right near the entrance. A block can be destroyed on the floor below the first ladder, which you can use to skip the majority of the tunnel. Climb down it, and destroy the similar block on the ground below. Take that ladder down and down again to the lowest level and head right. Break your way through the blocks to check the door on the right. If you're lucky, you'll find the Technodrome here. If you're not, you'll have to head back, and this time you must go the long way which will at least send you past a half pizza.
Tunnel D
This tunnel is the shortest of the three, but it's long stretch of the initial floor gives you very few places to hide from the mutant insects. You should avoid fighting with them to any extent possible, and only deal with them if you are forced to. Otherwise, keep moving right until you reach the ladder. Climb down to the next level. If you can avoid tangling with any enemies on this level on simply continue down to the next level, you should. The last level has no enemies. Simply bust through the blocks and check behind the door to see if the Technodrome is there. If not, you'll have to make your way back to the surface.
Tunnel E
This tunnel is possibly the most frustrating of them all, as it routinely puts you in positions where you are forced to fight and potentially take damage, and there's very little you can do to avoid it. It consists of four short floors and a lot of cramped spaces, so you can't even count on the mutant insects flinging themselves off screen like you can in other tunnels. If you are unfortunate and do not find the Technodrome down there, it's double the trouble to make your way back up with a decent amount of health left.
BOSS: Technodrome
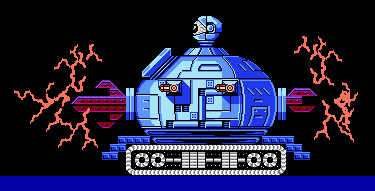
The boss of Area 5 is the Technodrome and it's big, the hardest Boss fight in the game. Having an abundance of subweapons makes this fight a lot easier to deal with. Otherwise, close quarter damage can cost you a lot of health in battle and made worse if you took too much damage prior to getting to the Technodrome. Technodrome has 6 areas of destruction; the front fork which has an electricity screen (Don is the only one who can hit it safely without getting hit without using subweapons), an escape hatch where foot soldiers come out of (and are a nuisance), two turrets which shoot at you, a rear fork that isn't much hardship and the eyeclops radar on top which is where the Technodrome takes damage (and deals out big damage to you if you bump into it.) You can stand on the treads in this fight and sometimes the staircase block pattern in the front can deal damage. Be careful and don't lose your cool in this battle. If you have an abundance of kiai scrolls, let em fly from the far left of the screen and you can win in a minute or two. If you don't, it all comes down to Don and his range and power advantage in taking out the Technodrome. The more parts of the Technodrome you destroy, the easier it gets.
Underpass #5
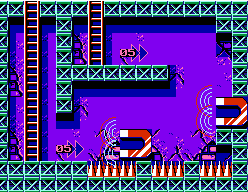
Meet the magnets. They don't cause any problems for you when you are on the ground. However, when you jump up and your feet leave the ground, the magnets will pull you toward them, making jumping in their direction faster, and jumping away from them slower. In this room, you have a few enemies to deal with. Remove as many as you can before making any jumps. Your goal is to reach the upper platform. To do so, you can't really jump from the far right magnet, you have to stand on the small patch of floor surrounded by spikes, and jump up to the platform. In the process, the right magnet will pull you toward it, but you can easily fight its influence and head left to reach the platform. Back outside, you have to walk up from one fenced area to another, and then head left to reach the next manhole and Underpass #7.
Underpass #6

When you arrive, use Donatello to clear away any enemies below you, and then drop to the floor. From here, you must contend with enemies, conveyor belts, spikes, and laser defense systems. Do your best to clear away any threat before you advance. But be on guard as you jump through the air for enemies that can collide with you mid-jump and send you falling backwards into a bed of spikes. Unlike in Underpass #3, you won't be able to walk across the gaps, you'll really have to jump for it this time. You should be able to make it to the next belt if you wait until you're over the edge of the previous belt before jumping. Once back outside, head right, up, and back to the left to reach Underpass #8.
Underpass #7

Climb down the ladder, and remove any flying enemies before heading right through the narrow tunnel. There are an inordinate amount of laser turrets throughout this underpass. You'll find the first two on the other side of the tunnel, along with an enemy. Remove them all, and then make your way to the right, destroying every turret you find.
You'll eventually reach a pair of magnets in the middle of the underpass. Back up and let the enemy on top of the magnets approach you and fall down into the spikes below. Then leap for the top of the magnets and collect the half pizza that will restore four bars of lost health to your active turtle. Then carefully jump down to the right. An enemy may attack you in mid-air and knock you back into the spikes so be prepared.
Continue to the right, destroying all of the laser turrets so that you can reach the exit safely. Jump down past the last magnet and watch out for the spikes on the floor below it. Clear away any enemies and climb up the ladder to the outside. The manhole immediately to your left is the exit from Underpass #8. The manhole above is the entrance to Underpass #9, and the one you should enter.